Going to school for your bach + masters (at the same time), working, wife'ing, and crafting will do that to a girl.
But there still has been a lot of crafting going on. I vow to keep this a budget blog and not a craft blog, but I just have to share this stinkin' cute project that I just finished (and for stinkin' cheap, so I guess it's still appropriate).
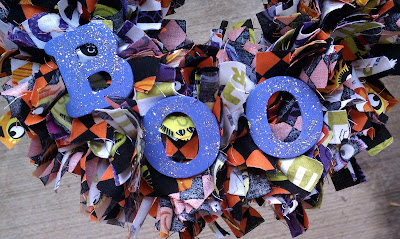
DIY: Halloween Rag Wreath
(but you can make it an any-occasion rag wreath just by changing the fabrics)
Supplies:
- 3/4 yds fabric - I chose three, and got 1/4 yd of each
- wire frame - I used an 8" wire frame for a smaller wreath. You can use a larger frame, but you will need more fabric!
- wooden letters
- paint + paint brush
- glitter
- wire
- glue gun
Step 1: I cut each section of fabric into 3/4 in x 5 in strips. This left me with EXACTLY enough fabric to make the wreath. Absolutely none to spare. So be careful and do not waste any!
Step 2: Start with the inner ring on one of the sections and tie fabric in a random pattern. I single-tied the fabric, because it would have left the tails too short if I double-tied it, but I pulled tight so that my hard work would not come undone!
Step 3: Keep tying. Tie, tie, tie! Put on a good movie, because you will be here a little longer than expected. Put just enough strips of fabric on each section of the frame that it covers the entire thing, but do not cram them on there (like I did at first) because you will not have enough fabric if you only get 3/4 yard.
Step 4: Once you have tied all of the fabric on the wreath, paint your letters! I chose a purple paint to match my fabric (I really love purple accent to Halloween's typical orange & black). I painted three layers onto the letters, and sprinkled glitter onto the last layer while the paint was still dry. (I do not have a picture of this stage. I did, however, take a picture of all the glitter on my table, and sent it to my sister. She hates glitter. I am such a loving sister.)
Step 5: Give your crafting hands a break and wait for your letters to dry.
Step 6: Hot glue wire onto the back of your letters. I used medium gauge floral wire, but you could use anything you have around the house (bobby pins, twist ties, etc.). Arrange your letters where you want them, and secure them by tying the wire together on the back. I also added a loop of wire to the top to hang my wreath from, but you can use ribbon, or a wreath hanger for this.
Step 7: Admire your hard work and your new wreath!
Stinkin' cute, right?!
Here is the breakdown:
Fabric: 3 1/4 yd cuts of fabric at $7.99 a piece = $5.99
I would have loved to have caught this fabric on sale, but alas. I did not.
Wire Frame: $1.27
Wooden Letters: $0.99 for a package of 4 B's and $0.99 for a package of 4 O's = $0.74
Paint: $0.67 - Anita's acrylic paint from Hobby Lobby. So cheap!
I had the glitter and wire left over from other projects, and the paint brush and glue gun already in tow.
So total cost of the super fun wreath: $8.67!!
Now I need to stake out the store until their Christmas fabric goes on sale. You know what I am going to be doing then.
Are you going to try your own Rag Wreath? Let me know!
Linds C.


